Do-it-yourself maintenance
Do-it-yourself service precautions
If you perform maintenance by yourself, be sure to follow the correct procedure as given in these sections.
|
>Items
|
>Parts and tools
|
| Battery condition |
|
| Brake fluid level |
|
| Engine coolant level |
|
| Engine oil level |
|
| Fuses |
|
| Light bulbs |
|
| Radiator and condenser |
>- |
| Tire inflation pressure |
|
| Washer fluid |
|
 Warning Warning
The engine compartment contains many mechanisms and fluids that may move suddenly, become hot, or become electrically energized. To avoid death or serious injury, observe the following precautions. When working on the engine compartment
When working near the electric cooling fans or radiator grille
Vehicles without a smart key system: be sure the engine switch is off. With the engine switch in the "on" position, the electric cooling fans may automatically start to run if the air conditioning is on and/or the coolant temperature is high. Vehicles with a smart key system: be sure the engine switch is off. With the engine switch in ignition on mode, the electric cooling fans may automatically start to run if the air conditioning is on and/or the coolant temperature is high. Safety glasses
Wear safety glasses to prevent flying or falling material, fluid spray, etc. From getting in your eyes. |
 Notice Notice
If you remove the air cleaner filter
Driving with the air cleaner filter removed may cause excessive engine wear due to dirt in the air. |
Hood
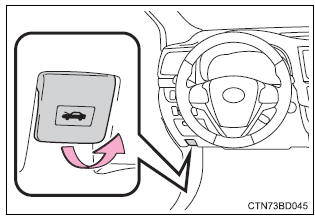
Release the lock from the inside of the vehicle to open the hood.
- Pull the hood lock release lever.
The hood will pop up slightly.
>
- Pull up the auxiliary catch lever and lift the hood.
>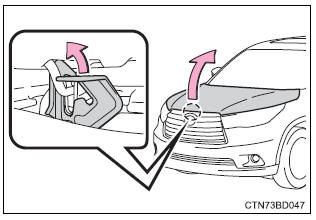
- Hold the hood open by inserting the support rod into the slot.
>
 Warning Warning
Pre-driving check
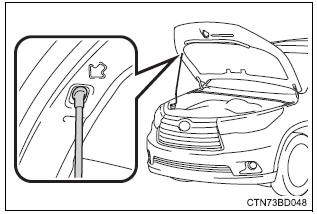
Check that the hood is fully closed and locked. If the hood is not locked properly, it may open while the vehicle is in motion and cause an accident, which may result in death or serious injury. After installing the support rod into the slot
Make sure the rod supports the hood securely preventing it from falling down onto your head or body. |
 Notice Notice
When closing the hood
Be sure to return the support rod to its clip before closing the hood. Closing the hood with the support rod not clipped could cause the hood to bend. |
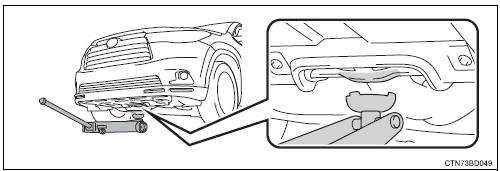
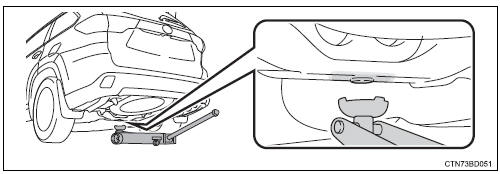
Positioning a floor jack
When using a floor jack, follow the instructions in the manual provided with the jack and perform the operation safely.
When raising your vehicle with a floor jack, position the jack correctly.
Improper placement may damage your vehicle or cause injury.
Front
>
Rear
>
Engine compartment
2.7 L 4-cylinder (1ar-fe) engine
>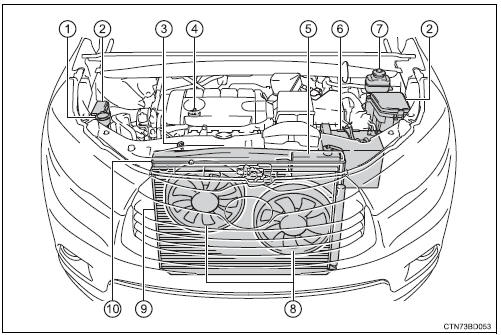
- Washer fluid tank
- Fuse boxes
- Engine oil level dipstick
- Engine oil filler cap
- Engine coolant reservoir
- Battery
- Brake fluid reservoir
- Electric cooling fans
- Condenser
- Radiator
3.5 L v6 (2gr-fe) engine
>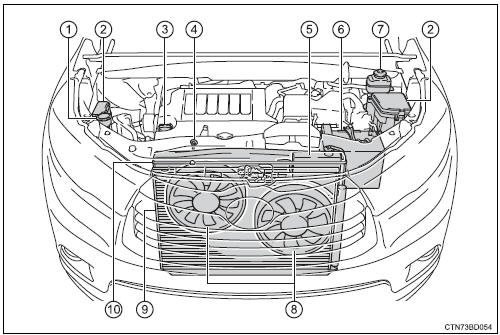
- Washer fluid tank
- Fuse boxes
- Engine oil filler cap
- Engine oil level dipstick
- Engine coolant reservoir
- Battery
- Brake fluid reservoir
- Electric cooling fans
- Vondenser
- Radiator
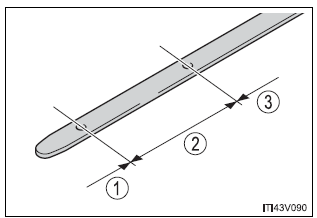
Engine oil
With the engine at operating temperature and turned off, check the oil level on the dipstick.
Checking the engine oil
- Park the vehicle on level ground. After warming up the engine and turning it off, wait more than 5 minutes for the oil to drain back into the bottom of the engine.
- Holding a rag under the end, pull the dipstick out.
- 2.7 L 4-cylinder (1ar-fe) engine
>
- 3.5 L v6 (2gr-fe) engine
>
- Wipe the dipstick clean.
- Reinsert the dipstick fully.
- Holding a rag under the end, pull the dipstick out and check the oil level.
>
- Low
- Normal
- Excessive
- Wipe the dipstick and reinsert it fully.
Adding engine oil
If the oil level is below or near the low level mark, add engine oil of the same type as that already in the engine.
- 2.7 L 4-cylinder (1ar-fe) engine
>
- 3.5 L v6 (2gr-fe) engine
>
Make sure to check the oil type and prepare the items needed before adding oil.
| Engine oil selection
|
|
| Oil quantity (low - full)
|
1.6 Qt. (1.5 L, 1.3 Imp. Qt.) |
| Items
|
Clean funnel |
- Remove the oil filler cap by turning it counterclockwise.
- Add engine oil slowly, checking the dipstick.
- Install the oil filler cap by turning it clockwise.
Engine oil consumption
A certain amount of engine oil will be consumed while driving. In the following situations, oil consumption may increase, and engine oil may need to be refilled in between oil maintenance intervals.
- When the engine is new, for example directly after purchasing the vehicle or after replacing the engine
- if low quality oil or oil of an inappropriate viscosity is used
- when driving at high engine speeds or with a heavy load, when towing, or when driving while accelerating or decelerating frequently
- when leaving the engine idling for a long time, or when driving frequently through heavy traffic
 Warning Warning
Used engine oil
|
 Notice Notice
To prevent serious engine damage
Check the oil level on a regular basis. Check the oil level on a regular basis.
|
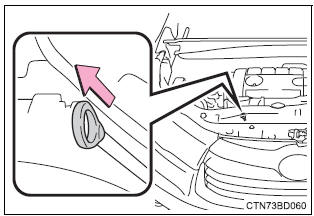
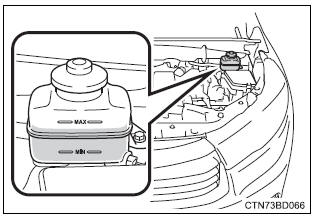
Engine coolant
The coolant level is satisfactory if it is between the “full” and “low” lines on the reservoir when the engine is cold.
- Reservoir cap
- “full” line
- “low” line
>
If the level is on or below the “low” line, add coolant up to the “full” line.
Coolant selection
Only use "toyota super long life coolant" or a similar high quality ethylene glycol based non-silicate, non-amine, non-nitrite, and non-borate coolant with long-life hybrid organic acid technology.
U.S.A.: "Toyota super long life coolant" is a mixture of 50% coolant and 50% deionized water. (Minimum temperature: -31°F [-35°C]) canada: "toyota super long life coolant" is a mixture of 55% coolant and 45% deionized water. (Minimum temperature: -44°F [-42°C]) for more details about coolant, contact your toyota dealer.
If the coolant level drops within a short time of replenishing
Visually check the radiator, hoses, engine coolant reservoir caps, drain cock and water pump.
If you cannot find a leak, have your toyota dealer test the cap and check for leaks in the cooling system.
 Warning Warning
When the engine is hot
Do not remove the engine coolant reservoir cap and radiator cap. The cooling system may be under pressure and may spray hot coolant if the cap is removed, causing serious injuries, such as burns. |
 Notice Notice
When adding coolant
Coolant is neither plain water nor straight antifreeze. The correct mixture of water and antifreeze must be used to provide proper lubrication, corrosion protection and cooling. Be sure to read the antifreeze or coolant label. If you spill coolant
Be sure to wash it off with water to prevent it from damaging parts or paint. |
Radiator and condenser
Check the radiator and condenser and clear away any foreign objects.
If either of the above parts is extremely dirty or you are not sure of their condition, have your vehicle inspected by your toyota dealer.
 Warning Warning
When the engine is hot
Do not touch the radiator or condenser as they may be hot and cause serious injuries, such as burns. |
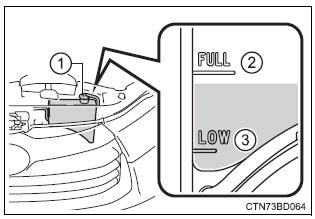
Brake fluid
Checking fluid level
The brake fluid level should be between the “max” and “min” lines on the tank.
>
Adding fluid
Make sure to check the fluid type and prepare the necessary item.
| Fluid type
|
Fmvss no.116 Dot 3 or sae j1703 brake fluid |
| Item
|
Clean funnel |
Brake fluid can absorb moisture from the air
Excess moisture in the brake fluid can cause a dangerous loss of braking efficiency.
Use only newly opened brake fluid.
 Warning Warning
When filling the reservoir
Take care as brake fluid can harm your hands and eyes and damage painted surfaces. If fluid gets on your hands or in your eyes, flush the affected area with clean water immediately. If you still experience discomfort, see a doctor. |
 Notice Notice
If the fluid level is low or high
It is normal for the brake fluid level to go down slightly as the brake pads wear out or when the fluid level in the accumulator is high. If the reservoir needs frequent refilling, there may be a serious problem. |
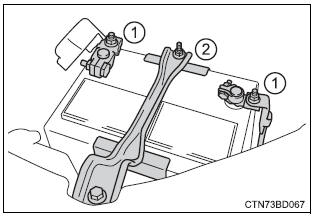
Battery
Check the battery as follows:
Battery exterior
Make sure that the battery terminals are not corroded and that there are no loose connections, cracks, or loose clamps.
- Terminals
- Hold-down clamp
>
Before recharging
When recharging, the battery produces hydrogen gas which is flammable and explosive. Therefore, observe the following before recharging:
- if recharging with the battery installed on the vehicle, be sure to disconnect the ground cable.
- Make sure the power switch on the charger is off when connecting and disconnecting the charger cables to the battery.
After recharging/reconnecting the battery (vehicles with a smart key system)
The engine may not start. Follow the procedure below to initialize the system.
- Shift the shift lever to p.
- Open and close any of the doors.
- Restart the engine.
- Unlocking the doors using the smart key system may not be possible immediately after reconnecting the battery. If this happens, use the wireless remote control or the mechanical key to lock/unlock the doors.
- Start the engine with the engine switch in accessory mode. The engine may not start with the engine switch turned off. However, the engine will operate normally from the second attempt.
- The engine switch mode is recorded by the vehicle. If the battery is disconnected and reconnected, the vehicle will return the engine switch mode to the status it was in before the battery was disconnected. Make sure to turn off the engine before disconnecting the battery. Take extra care when connecting the battery if the engine switch mode prior to the battery being disconnected is unknown.
If the system will not start even after multiple attempts, contact your toyota dealer.
 Warning Warning
Chemicals in the battery
Batteries contain poisonous and corrosive sulfuric acid and may produce hydrogen gas which is flammable and explosive. To reduce the risk of death or serious injury, take the following precautions while working on or near the battery:
Where to safely charge the battery
Always charge the battery in an open area. Do not charge the battery in a garage or closed room where there is insufficient ventilation. How to recharge the battery
Only perform a slow charge (5 a or less). The battery may explode if charged at a quicker rate. Emergency measures regarding electrolyte
|
 Notice Notice
When recharging the battery
Never recharge the battery while the engine is operating. Also, be sure all accessories are turned off. |
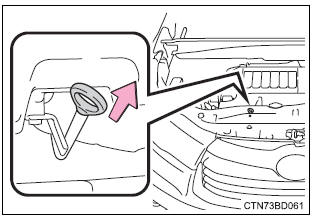
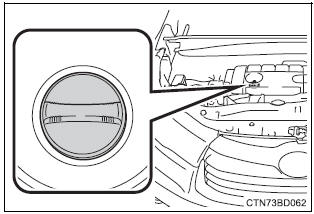
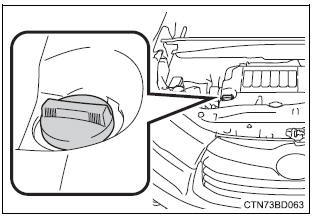
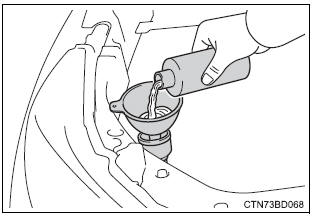
Washer fluid
If any washer does not work or the warning message appears on the multi-information display, the washer tank may be empty. Add washer fluid.
>
 Warning Warning
When adding washer fluid
Do not add washer fluid when the engine is hot or running as washer fluid contains alcohol and may catch fire if spilled on the engine etc. |
 Notice Notice
Do not use any fluid other than washer fluid
Do not use soapy water or engine antifreeze instead of washer fluid. Doing so may cause streaking on the vehicle's painted surfaces. Diluting washer fluid
Dilute washer fluid with water as necessary. Refer to the freezing temperatures listed on the label of the washer fluid bottle. |
Tires
Replace or rotate tires in accordance with maintenance schedules and treadwear.
Checking tires
- New tread
- Treadwear indicator
- Worn tread
>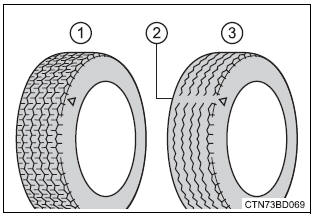
The location of treadwear indicators is shown by the "twi" or "ƒ´" marks, etc., Molded on the sidewall of each tire.
Check spare tire condition and pressure if not rotated.
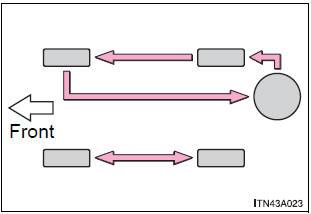
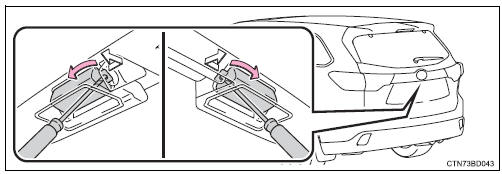
Tire rotation
Rotate the tires in the order shown.
- Vehicles with compact spare tire
>
- Vehicles with full-size spare tire
>
Do not fail to initialize the tire pressure warning system after tire rotation.
To equalize tire wear and extend tire life, toyota recommends that tire rotation is carried out at the same interval as tire inspection.
Tire pressure warning system
Your vehicle is equipped with a tire pressure warning system that uses tire pressure warning valves and transmitters to detect low tire inflation pressure before serious problems arise.
If the tire pressure drops below a predetermined level, the driver is warned by a warning light.
Installing tire pressure warning valves and transmitters
When replacing tires or wheels, tire pressure warning valves and transmitters must also be installed.
When new tire pressure warning valves and transmitters are installed, new id codes must be registered in the tire pressure warning computer and the tire pressure warning system must be initialized. Have tire pressure warning valve and transmitter id codes registered by your toyota dealer.
Initializing the tire pressure warning system
The tire pressure warning system must be initialized in the following circumstances:
- When the tire inflation pressure is changed such as when changing traveling speed or load weight.
When the tire pressure warning system is initialized, the current tire inflation pressure is set as the benchmark pressure.
How to initialize the tire pressure warning system
- Park the vehicle in a safe place and turn the engine switch to the "lock" position (vehicles without a smart key system) or off (vehicles with a smart key system).
Initialization cannot be performed while the vehicle is moving.
- Adjust the tire inflation pressure to the specified cold tire inflation pressure level. Make sure to adjust the tire pressure to the specified cold tire inflation pressure level. The tire pressure warning system will operate based on this pressure level.
- Turn the engine switch to the "on" position (vehicles without a smart key system) or ignition on mode (vehicles with a smart key system).
- Press and hold the tire pressure warning reset switch until the tire pressure warning light blinks slowly 3 times.
>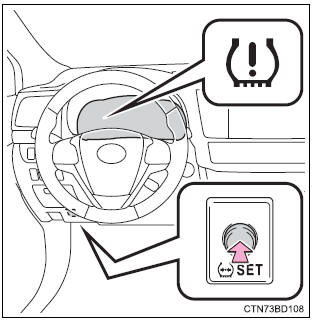
- Vehicles without a smart key system: wait for a few minutes with the engine switch in the “on” position and then turn the engine switch to the “acc” or “lock” position.
Vehicles with a smart key system: wait for a few minutes with the engine switch in ignition on mode and then turn the engine switch off.
Registering id codes
The tire pressure warning valve and transmitter is equipped with a unique id code. When replacing a tire pressure warning valve and transmitter, it is necessary to register the id code. Have the id code registered by your toyota dealer.
When to replace your vehicle's tires
Tires should be replaced if:
- you have tire damage such as cuts, splits, cracks deep enough to expose the fabric, and bulges indicating internal damage
- a tire goes flat repeatedly or cannot be properly repaired due to the size or location of a cut or other damage
If you are not sure, consult with your toyota dealer.
Replacing tires and wheels
If the id code of the tire pressure warning valve and transmitter is not registered, the tire pressure warning system will not work properly. After driving for about 20 minutes, the tire pressure warning light blinks for 1 minute and stays on to indicate a system malfunction.
Tire life
Any tire over 6 years old must be checked by a qualified technician even if it has seldom or never been used or damage is not obvious.
Proper storage of the spare tire
As an improperly stored spare tire may cause damage to the wire cable that holds it, check that the spare tire is stored properly on a daily basis.
- If the stored spare tire is slanted or causes a rattle while driving, properly store the spare tire by following the tire change procedure correctly .
>
- If the spare tire is slanted, the hoist assembly may be stuck in the wheel opening. If the spare tire rattles while driving, it may not be fully raised. Lower the spare tire to the ground and make sure that the hoist assembly is perpendicular to the wheel opening.
- Raise the tire slowly and steadily until a click is heard and the jack handle skips.
- If the spare tire cannot be lowered, the wire cable may be severed.
Have the vehicle inspected at your toyota dealer.
Routine tire inflation pressure checks
The tire pressure warning system does not replace routine tire inflation pressure checks. Make sure to check tire inflation pressure as part of your routine of daily vehicle checks.
Maximum load of tire
Check that the number given by dividing the maximum load by 1.10 Of the replacement tire is greater than 1/2 of the gross axle weight ratings (gawr) of either the front axle or the rear axle, whichever is greater.
For the gawr, see the certification label. For the maximum load of the tire, see the load limit at maximum cold tire inflation pressure mentioned on the sidewall of the tire.
>
Tire types
- Summer tires
Summer tires are high-speed performance tires best suited to highway driving under dry conditions. Since summer tires do not have the same traction performance as snow tires, summer tires are inadequate for driving on snow-covered or icy roads. For driving on snow-covered roads or icy roads, the use of snow tires is recommended. When installing snow tires, be sure to replace all four tires.
- All season tires
All season tires are designed to provide better traction in snow and to be adequate for driving in most winter conditions as well as for use year-round. All season tires, however, do not have adequate traction performance compared with snow tires in heavy or loose snow. Also, all season tires fall short in acceleration and handling performance compared with summer tires in highway driving.
- Snow tires
For driving on snow-covered roads or icy roads, we recommend using snow tires. If you need snow tires, select tires of the same size, construction and load capacity as the originally installed tires. Since your vehicle has radial tires as original equipment, make sure your snow tires also have radial construction. Do not install studded tires without first checking local regulations for possible restrictions. Snow tires should be installed on all wheels.
If the tread on snow tires wears down below 0.16 In. (4 Mm)
The effectiveness of the tires as snow tires is lost.
Situations in which the tire pressure warning system may not operate properly
- In the following cases, the tire pressure warning system may not operate properly.
- If non-genuine toyota wheels are used.
- A tire has been replaced with a tire that is not an oe (original equipment) tire.
- A tire has been replaced with a tire that is not of the specified size.
- Tire chains etc. Are equipped.
- Lock nuts are equipped.
- An auxiliary-supported run-flat tire is equipped.
- If a window tint that affects the radio wave signals is installed.
- If there is a lot of snow or ice on the vehicle, particularly around the wheels or wheel housings.
- If the tire inflation pressure is extremely higher than the specified level.
- If the spare tire is in a location subject to poor radio wave signal reception.*
- If a large metallic object which can interfere with signal reception is put in the luggage compartment.*
*: Vehicles with a full-size spare tire only
- Performance may be affected in the following situations.
- Near a tv tower, electric power plant, gas station, radio station, large display, airport or other facility that generates strong radio waves or electrical noise
- When carrying a portable radio, cellular phone, cordless phone or other wireless communication device
- When the vehicle is parked, the time taken for the warning to start or go off could be extended.
- When tire inflation pressure declines rapidly for example when a tire has burst, the warning may not function.
The initialization operation
- Make sure to carry out initialization after adjusting the tire inflation pressure.
Also, make sure the tires are cold before carrying out initialization or tire inflation pressure adjustment.
- If you have accidentally turned the engine switch to the "lock" position (vehicles without a smart key system) or off (vehicles with a smart key system) during initialization, it is not necessary to press the reset switch again as initialization will restart automatically when the engine switch has been turned to the "on" position (vehicles without a smart key system) or ignition on mode (vehicles with a smart key system) for the next time.
- If you accidentally press the reset switch when initialization is not necessary, adjust the tire inflation pressure to the specified level when the tires are cold, and conduct initialization again.
When initialization of the tire pressure warning system has failed
Initialization can be completed in a few minutes. However, in the following cases, the settings have not been recorded and the system will not operate properly. If repeated attempts to record tire inflation pressure settings are unsuccessful, have the vehicle inspected by your toyota dealer.
- When operating the tire pressure warning reset switch, the tire pressure warning light does not blink 3 times.
- After carrying out the initialization procedure, the tire pressure warning light blinks for 1 minute then stays on after driving for 20 minutes.
Tire pressure warning system certification
Trw automotive tire pressure monitoring sensor fcc id: gq4-51t
Note
: this device complies with part 15 of the fcc rules. Operation is subject to the following two conditions:
- this device may not cause harmful interference, and
- this device must accept any interference received, including interference that may cause undesired operation.
Warning
: changes or modifications not expressly approved by the party responsible for compliance could void the user’s authority to operate the equipment.
Trw automotive tire pressure monitoring sensor model: 228408 ic: 1470a-32t made in u.S.A
Note
: this device complies with industry canada license-exempt rss standard(s). Operation is subject to the following two conditions:
- this device may not cause harmful interference, and
- this device must accept any interference received, including interference that may cause undesired operation of the device.
Le présent appareil est conforme aux cnr d’lndustrie canada applicables aux appareils radio exempts de licence. L’exploitation est autorisée aux deux conditions suivantes :
- l’appareil ne doit pas produire de brouillage, et
- l’utilisateur de l’appareil doit accepter tout brouillage radioélectrique subi, même si le brouillage est susceptible d’en compromettre le fonctionnement.
Fcc id: paxpmvc010
Note
: this device complies with part 15 of the fcc rules. Operation is subject to the following two conditions: (1) this device may not cause harmful interference, and (2) this device must accept any interference received, including interference that may cause undesired operation. Fcc warning: changes or modifications not expressly approved by the party responsible for compliance could void the user’s authority to operate the equipment.
Note
: operation is subject to the following two conditions: (1) this device may not cause interference, and (2) this device must accept any interference, including interference that may cause undesired operation of the device.
Note
: l’utilisation de ce dispositif est autorisée seulement aux deux conditions suivantes : (1) il ne doit pas produire de brouillage, et (2) l’utilisateur du dispositif doit être prêt à accepter tout brouillage radioélectrique reçu, même si ce brouillage est susceptible de compromettre le fonctionnement du dispositif.
 Warning Warning
When inspecting or replacing tires
Observe the following precautions to prevent accidents. Failure to do so may cause damage to parts of the drive train as well as dangerous handling characteristics, which may lead to an accident resulting in death or serious injury.
When initializing the tire pressure warning system
Do not operate the tire pressure warning reset switch without first adjusting the tire inflation pressure to the specified level. Otherwise, the tire pressure warning light may not come on even if the tire inflation pressure is low, or it may come on when the tire inflation pressure is actually normal. |
 Notice Notice
Repairing or replacing tires, wheels, tire pressure warning valves, transmitters and tire valve caps
To avoid damage to the tire pressure warning valves and transmitters
When a tire is repaired with liquid sealants, the tire pressure warning valve and transmitter may not operate properly. If a liquid sealant is used, contact your toyota dealer or other qualified service shop as soon as possible. Make sure to replace the tire pressure warning valve and transmitter when replacing the tire. Driving on rough roads
Take particular care when driving on roads with loose surfaces or potholes. These conditions may cause losses in tire inflation pressure, reducing the cushioning ability of the tires. In addition, driving on rough roads may cause damage to the tires themselves, as well as the vehicle's wheels and body. If tire inflation pressure of each tire becomes low while driving
Do not continue driving, or your tires and/or wheels may be ruined. |
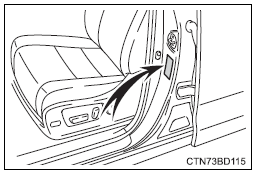
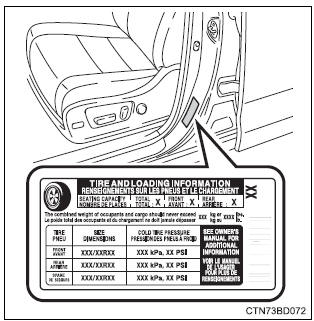
Tire inflation pressure
Tire inflation pressure
The recommended cold tire inflation pressure and tire size are displayed on the tire and loading information label.
>
Inspection and adjustment procedure
- Tire valve
- Tire pressure gauge
>
- Remove the tire valve cap.
- Press the tip of the tire pressure gauge onto the tire valve.
- Read the pressure using the gauge gradations.
- If the tire inflation pressure is not at the recommended level, adjust the pressure.
If you add too much air, press the center of the valve to deflate.
- After completing the tire inflation pressure measurement and adjustment, apply soapy water to the valve and check for leakage.
- Put the tire valve cap back on.
Tire inflation pressure check interval
You should check tire inflation pressure every two weeks, or at least once a month.
Do not forget to check the spare.
Effects of incorrect tire inflation pressure
Driving with incorrect tire inflation pressure may result in the following:
- reduced fuel efficiency
- reduced driving comfort and tire life
- reduced safety
- damage to the drive train
If a tire needs frequent inflating, have it checked by your toyota dealer.
Instructions for checking tire inflation pressure
When checking tire inflation pressure, observe the following:
- check only when the tires are cold.
If your vehicle has been parked for at least 3 hours or has not been driven for more than 1 mile or 1.5 Km, you will get an accurate cold tire inflation pressure reading.
- Always use a tire pressure gauge.
The appearance of the tire can be misleading. In addition, tire inflation pressure that is even just a few pounds off can affect ride quality and handling.
- Do not reduce tire inflation pressure after driving. It is normal for tire inflation pressure to be higher after driving.
- Never exceed the vehicle capacity weight.
Passengers and luggage weight should be placed so that the vehicle is balanced.
 Warning Warning
Proper inflation is critical to save tire performance
Keep your tires properly inflated. Otherwise, the following conditions may occur and result in an accident causing death or serious injury:
|
 Notice Notice
When inspecting and adjusting tire inflation pressure
Be sure to put the tire valve caps back on. Without the valve caps, dirt or moisture could get into the valve and cause air leakage, which could result in an accident. If the caps are lost, replace them as soon as possible. |
Wheels
If a wheel is bent, cracked or heavily corroded, it should be replaced. Otherwise, the tire may separate from the wheel or cause a loss of handling control.
Wheel selection
When replacing wheels, care should be taken to ensure that they are equivalent to those removed in load capacity, diameter, rim width and inset*.
Replacement wheels are available at your toyota dealer.
*: Conventionally referred to as "offset".
Toyota does not recommend using the following:
- wheels of different sizes or types
- used wheels
- bent wheels that have been straightened
Aluminum wheel precautions
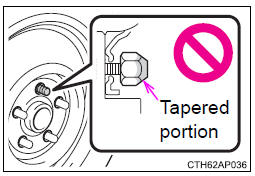
- Use only toyota wheel nuts and wrenches designed for use with your aluminum wheels.
- When rotating, repairing or changing your tires, check that the wheel nuts are still tight after driving 1000 miles (1600 km).
- Be careful not to damage the aluminum wheels when using tire chains.
- Use only toyota genuine balance weights or equivalent and a plastic or rubber hammer when balancing your wheels.
When replacing wheels
The wheels of your vehicle are equipped with tire pressure warning valves and transmitters that allow the tire pressure warning system to provide advance warning in the event of a loss in tire inflation pressure.
Whenever wheels are replaced, tire pressure warning valves and transmitters must be installed.
 Warning Warning
When replacing wheels
When installing the wheel nuts
>
|
 Notice Notice
Replacing tire pressure warning valves and transmitters
|
Air conditioning filter
The air conditioning filter must be changed regularly to maintain air conditioning efficiency.
Removal method
- Vehicles without a smart key system: turn the engine switch to the “lock” position.
Vehicles with a smart key system: turn the engine switch off.
- Open the glove box. Slide off the damper.
>
- Push in the glove box on the vehicle’s outer side to disconnect the claws. Then pull out the glove box and disconnect the lower claws.
>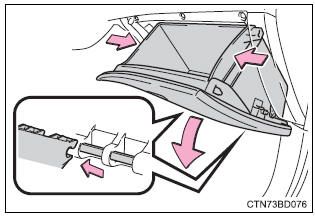
- Pull down the cover.
>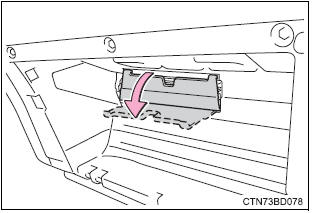
- Remove the filter cover.
>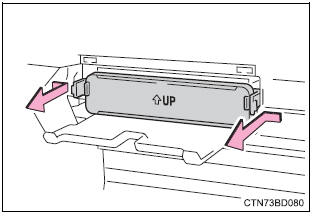
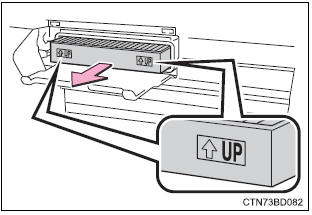
- Remove the air conditioning filter and replace it with a new one.
The "„↑up" marks shown on the filter should be pointing up.
>
Checking interval
Inspect and replace the air conditioning filter according to the maintenance schedule. In dusty areas or areas with heavy traffic flow, early replacement may be required. (For scheduled maintenance information, please refer to the "schedule maintenance guide" or "owner's manual supplement".)
If air flow from the vents decreases dramatically
The filter may be clogged. Check the filter and replace if necessary.
 Notice Notice
When using the air conditioning system
Make sure that a filter is always installed. Using the air conditioning system without a filter may cause damage to the system. |
Wireless remote control/ electronic key battery
Replace the battery with a new one if it is depleted.
You will need the following items:
- Flathead screwdriver
- small flathead screwdriver
- lithium battery cr2016 (vehicles without a smart key system), or cr2032 (vehicles with a smart key system)
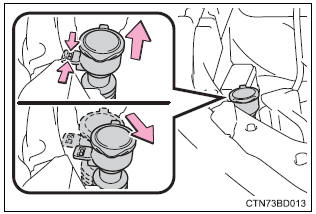
Replacing the battery
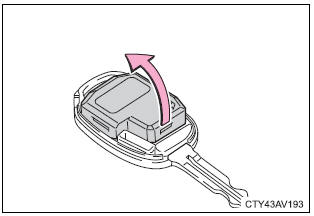
- Vehicles without a smart key system
- Remove the cover.
To prevent damage to the key, cover the tip of the flathead screwdriver with a rag.
To prevent the buttons from being disassembled, face the button surface downward.
>
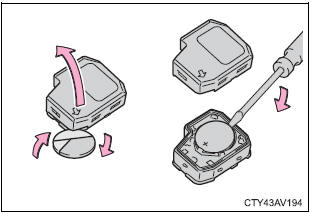
- Remove the module.
>
- Open the case cover using a coin protected with tape etc.
And remove the depleted battery using a small flathead screwdriver.
Insert a new battery with the “+” terminal facing up.
>
- Vehicles with a smart key system
- Take out the mechanical key.
>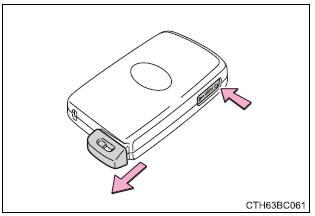
- Remove the cover.
To prevent damage to the key, cover the tip of the flathead screwdriver with a rag.
>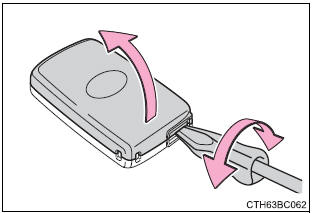
- Remove the depleted battery.
Insert a new battery with the “+” terminal facing up.
>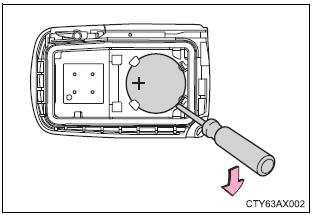
Use a cr2016 (vehicles without a smart key system) or cr2032 (vehicles with a smart key system) lithium battery
- Batteries can be purchased at your toyota dealer, local electrical appliance shops or camera stores.
- Replace only with the same or equivalent type recommended by the manufacturer.
- Dispose of used batteries according to local laws.
If the key battery is depleted
The following symptoms may occur:
- the smart key system (if equipped) and wireless remote control will not function properly.
- The operational range will be reduced.
 Warning Warning
Removed battery and other parts
These parts are small and if swallowed by a child, they can cause choking. Keep away from children. Failure to do so could result in death or serious injury. |
 Notice Notice
For normal operation after replacing the battery
Observe the following precautions to prevent accidents:
|
Checking and replacing fuses
If any of the electrical components do not operate, a fuse may have blown. If this happens, check and replace the fuses as necessary.
- Vehicles without a smart key system: turn the engine switch to the "lock" position.
Vehicles with a smart key system: turn the engine switch off.
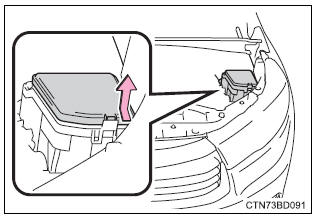
- Open the fuse box cover.
- engine compartment (type a fuse box)
Push the tab in and lift the lid off.
>
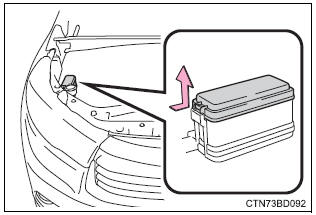
- Engine compartment (type b fuse box)
Push the tab in and lift the lid off.
>
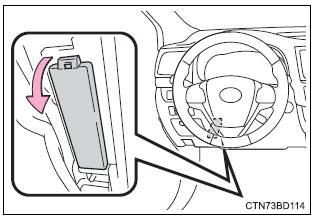
- Under the driver’s side instrument panel
Remove the lid.
>
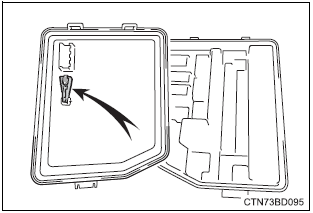
- Remove the fuse with the pullout tool.
Only type a fuses can be removed using the pullout tool.
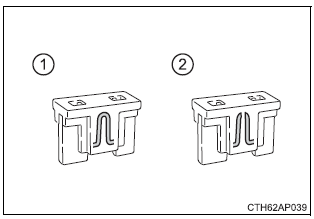
- Check if the fuse is blown.
>
- Normal fuse
- Blown fuse
Type a and b: replace the blown fuse with a new fuse of an appropriate amperage rating.
The amperage rating can be found on the fuse box lid.
Type c:
Contact your toyota dealer.
- Type a
>
- Type b
>
- Type c
>
After a fuse is replaced
- If the lights do not turn on even after the fuse has been replaced, a bulb may need replacement.
- If the replaced fuse blows again, have the vehicle inspected by your toyota dealer.
If there is an overload in a circuit
The fuses are designed to blow, protecting the wiring harness from damage.
When replacing light bulbs
Toyota recommends that you use genuine toyota products designed for this vehicle. Because certain bulbs are connected to circuits designed to prevent overload, non-genuine parts or parts not designed for this vehicle may be unusable.
 Warning Warning
To prevent system breakdowns and vehicle fire
Observe the following precautions. Failure to do so may cause damage to the vehicle, and possibly a fire or injury.
|
 Notice Notice
Before replacing fuses
Have the cause of electrical overload determined and repaired by your toyota dealer as soon as possible. |
Light bulbs
You may replace the following bulbs by yourself. The difficulty level of replacement varies depending on the bulb. If necessary bulb replacement seems difficult to perform, contact your toyota dealer.
For more information about replacing other light bulbs, contact your toyota dealer.
Preparing for light bulb replacement
Check the wattage of the light bulb to be replaced.
Turning off the power back door main switch (if equipped)
Bulb locations
Front
>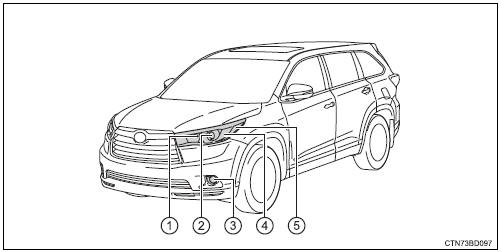
- Headlight high beam/daytime running light
- Headlight low beam
- Front fog light (if equipped)
- Front turn signal light/parking light
- Front side marker light
Rear
>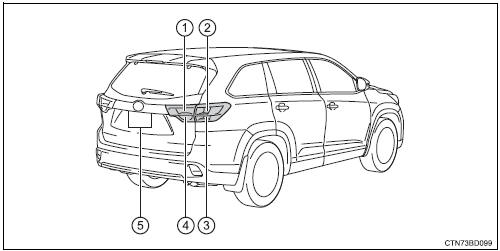
- Tail light
- Stop/tail light and rear side marker light
- Rear turn signal light
- Back-up light
- License plate lights
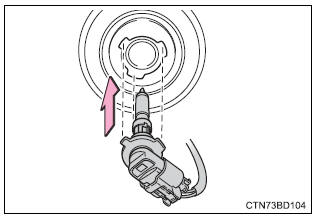
Replacing light bulbs
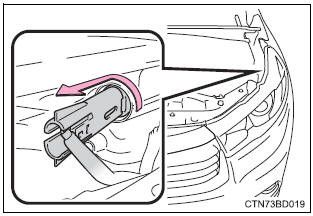
Headlight low beams
- For the right side only: remove the washer fluid tank opening.
>
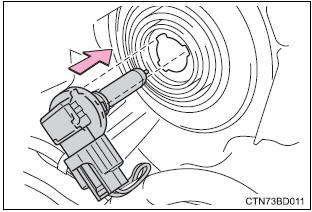
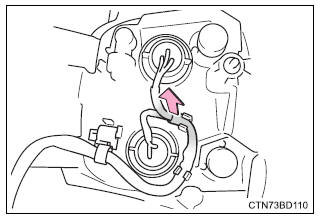
- Turn the bulb base counterclockwise.
>
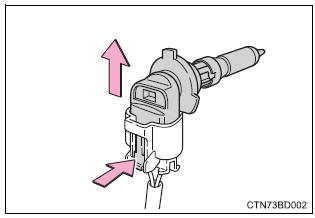
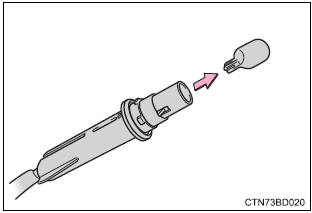
- Unplug the connector while pressing the lock release.
>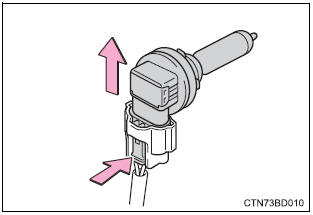
- Replace the light bulb, and install the bulb base.
Align the 3 tabs on the light bulb with the mounting and insert.
>
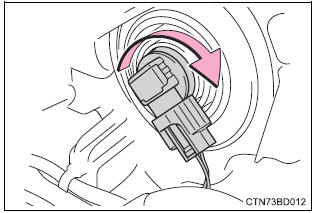
- Turn and secure the bulb base.
Shake the bulb base gently to check that it is not loose, turn the headlight low beams on once and visually confirm that no light is leaking through the mounting.
>
- For the right side only: install the washer fluid tank.
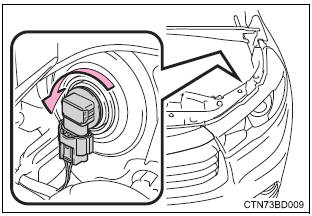
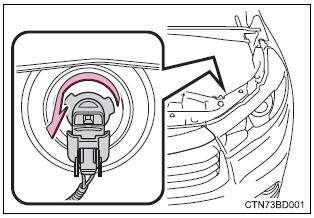
Headlight high beams/daytime running lights
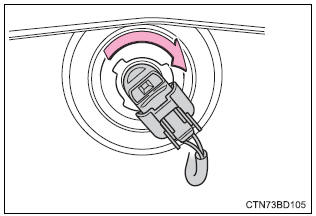
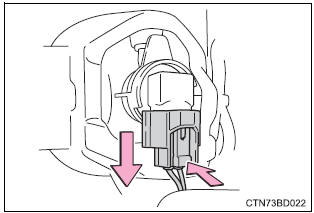
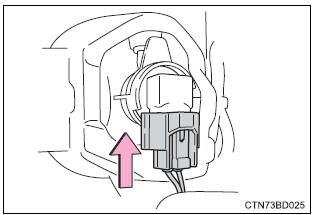
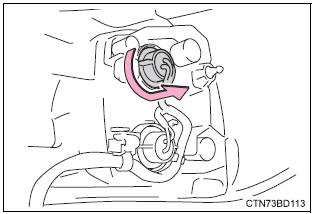
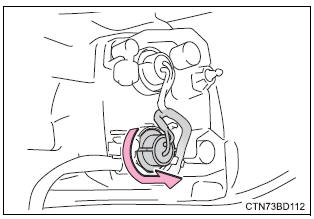
- Turn the bulb base counterclockwise.
>
- Unplug the connector while pressing the lock release.
>
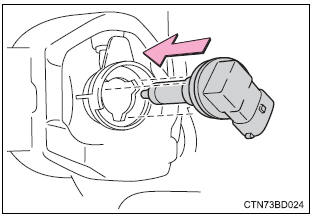
- Replace the light bulb, and install the bulb base.
Align the 3 tabs on the light bulb with the mounting, and insert.
>
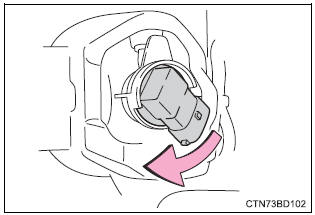
- Turn and secure the bulb base.
Shake the bulb base gently to check that it is not loose, turn the headlights on once and visually confirm that no light is leaking through the mounting.
>
Front turn signal lights/parking lights
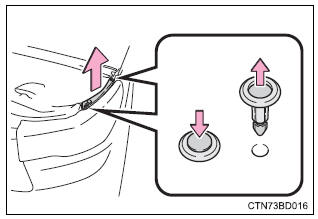
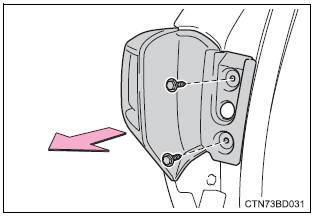
- Remove the 2 clips and remove the side cover.
>
- Turn the bulb base counterclockwise.
>
- Remove the light bulb.
>
- Install by conducting 3 and 2 with the directions reversed.
- Install the side cover and then install the 2 clips.
>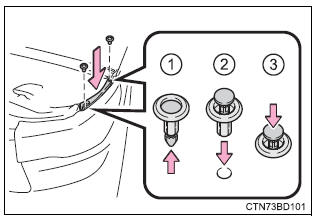
Front side marker lights
- Remove the 2 clips and remove the side cover.
>
- Turn the bulb base counterclockwise.
>
- Remove the light bulb.
>
- Install by conducting 2 and 3 with the directions reversed.
- Install the side cover and then install the 2 clips.
>
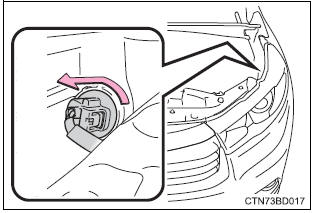
Front fog lights (if equipped)
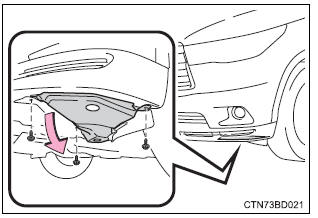
- Remove the 3 screws and partly remove the fender liner.
>
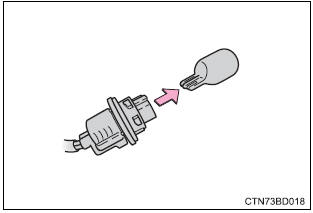
- Unplug the connector while pressing the lock release.
>
- Turn the bulb base counterclockwise.
>
- Install a new light bulb.
Align the 3 tabs on the light bulb with the mounting and insert.
>
- Turn clockwise and secure the bulb base.
>
- Install the connector.
Shake the connector gently to check that it is not loose, turn the front fog lights on once and visually confirm that no light is leaking through the mounting.
>
- When installing the fender liner, install by conducting with the directions reversed.
Make sure that the fender liner is attached to the inside of the bumper.
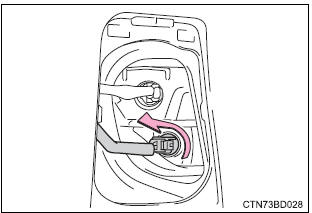
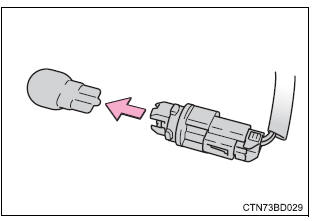
Stop/tail lights and rear side marker lights, and rear turn signal lights
- Open the back door and remove the 2 screws, and remove the lamp assembly by pulling it directly backward from the rear of the vehicle.
>
- Remove the wire harness.
>
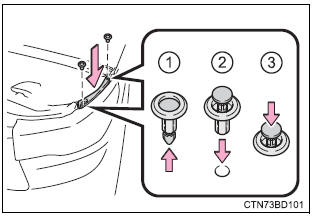
- Turn the bulb base counterclockwise.
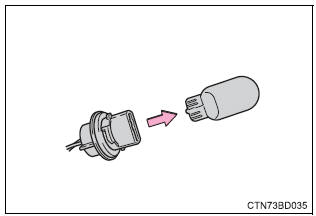
- Stop/tail lights and rear side marker lights
>
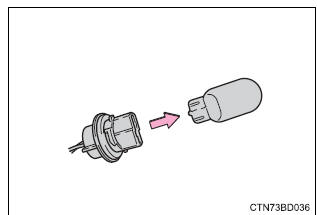
- Rear turn signal lights
>
- Remove the light bulb.
- Stop/tail lights and rear side marker lights
>
- Rear turn signal light
>
- When installing the light bulb, install by conducting 4, 3 and 2 with the directions reversed.
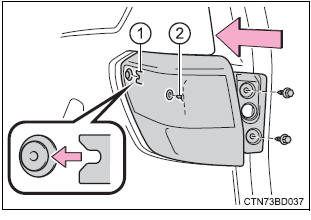
- Install the lamp assembly and then install the 2 screws.
Align the guide (1 ) and pin (2 ) on the lamp assembly with the mounting when installing it.
>
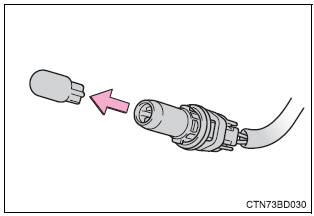
Tail lights and back-up lights
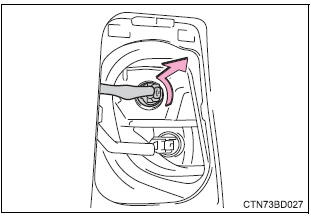
- Open the back door and remove the cover.
Insert a flathead screwdriver or similar into the hole at the top of the cover and remove it as shown in the illustration.
To prevent damaging the vehicle, wrap the flathead screwdriver with a tape.
- Turn the bulb base counterclockwise.
>
- Tail lights
>
- Back-up lights
>
- Remove the light bulb
- Tail lights
>
- Back-up lights
>
- When installing, reverse the steps listed
License plate lights
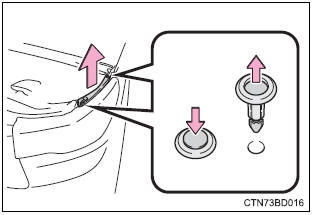
- Remove the lens.
>
Insert a properly sized screwdriver into the hole of the lens on the inner side and disengage the claw and pry the lens toward the outer side as shown in the illustration.
To prevent damaging the vehicle, wrap the tip of the screwdriver with tape.
- Remove the light bulb.
>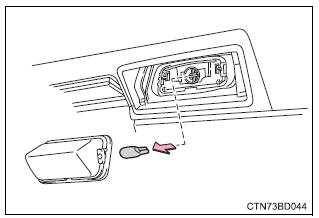
- When installing, reverse the steps listed.
Replacing the following bulbs
If any of the lights listed below has burnt out, have it replaced by your toyota dealer.
- Side turn signal lights
- daytime running lights (led type)
- high mounted stoplight
- outer foot lights (if equipped)
Led light bulbs
The side turn signal lights, daytime running lights (led type), high mounted stoplight and outer foot lights (if equipped) consist of a number of leds. If any of the leds burns out, take your vehicle to your toyota dealer to have the light replaced.
Condensation build-up on the inside of the lens
Temporary condensation build-up on the inside of the headlight lens does not indicate a malfunction.
Contact your toyota dealer for more information in the following situations:
- large drops of water have built up on the inside of the lens.
- Water has built up inside the headlight.
When replacing light bulbs
 Warning Warning
Replacing light bulbs
To prevent damage or fire
Make sure bulbs are fully seated and locked. |
Download Manual